• claude
  • Using Claude to Develop a Trading Bot πŸ€–

    In this post I want to show something practical: how I used Claude Code as a real development assistant to build a trading bot from scratch.

    Not a toy script.
    Not a fake demo.
    A real automated trading system with:

    • strategy design
    • backtesting
    • historical data
    • risk management
    • dashboard
    • and live demo trading

    Everything you see here was generated step-by-step using Claude and refined with real execution on my machine.


    Step 1 – Starting the Project

    The first thing I did was start with a completely clean project.

    This is important because most tutorials start from half-built code. In this case, the idea was simple:

    Let Claude guide the entire development from zero.

    What I asked Claude to do

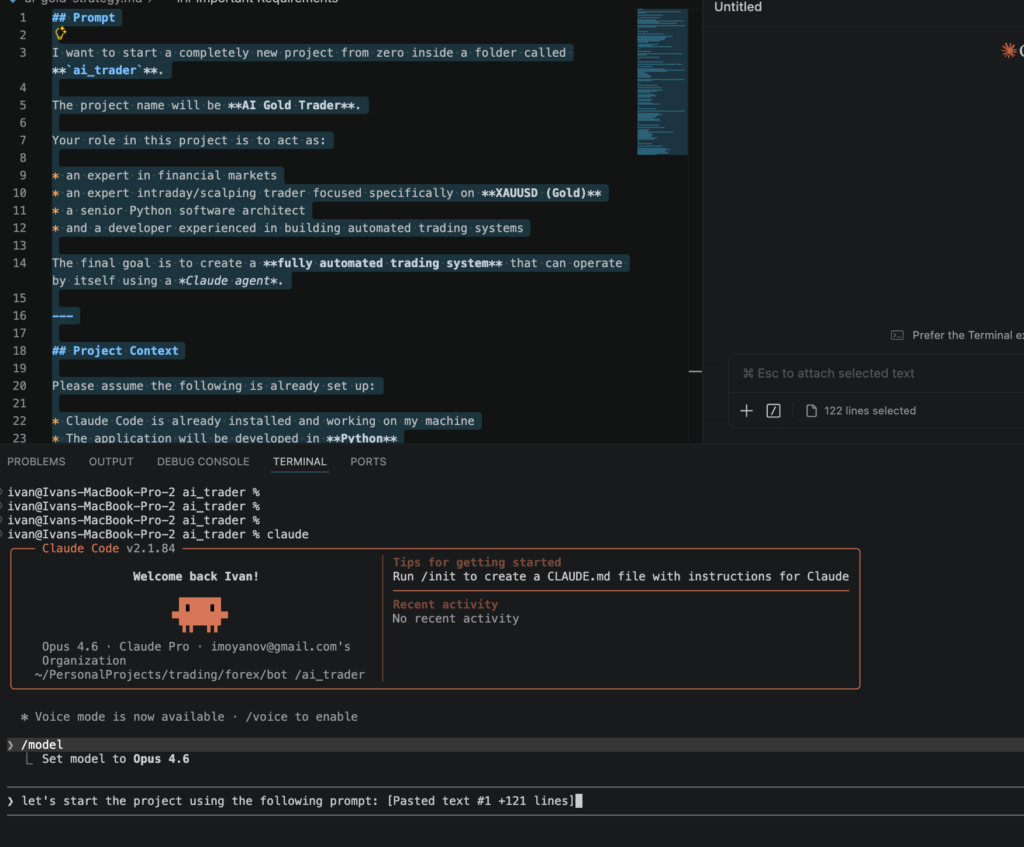
    I created a new folder called:

    ai_trader
    

    Then I defined the goal clearly:

    • The project name: AI Gold Trader
    • Language: Python
    • Database: PostgreSQL
    • Deployment target: Windows VPS
    • Broker: Pepperstone demo account
    • Goal: fully automated trading

    You can see the claude starting point:

    This step is important because Claude performs much better when the goal is extremely explicit from the beginning.


    Step 2 – Choosing the Model

    Before writing any code, I configured Claude Code with the correct model.

    The reason is simple:

    If you’re building something complex like a trading system (strategy + data + risk management + backtesting + automation), you need a model that can reason across multiple files and steps.

    This step might look small, but it’s actually critical because the model becomes your technical lead for the project.


    Step 3 – Writing the Prompt That Defines Everything

    Instead of asking random questions, I wrote a structured prompt that defines:

    • the goal of the project
    • the responsibilities of the AI
    • the development phases
    • and the technical constraints

    The key idea here is this:

    Claude is much more powerful when you treat it like a senior engineer instead of a chatbot.

    So the prompt explicitly tells Claude to act as:

    • a financial markets expert
    • a gold scalping trader (XAUUSD)
    • a Python architect
    • and a developer experienced in automated trading systems

    This completely changes the quality of the output.


    Step 4 – The First Real Result: A Fully Defined Trading Strategy

    After sending the prompt, Claude didn’t generate random code.

    Instead, it started with the most important step:

    A real, rule-based trading strategy.

    That strategy includes:

    Timeframes

    • M15 β†’ trend filter
    • M5 β†’ execution timeframe
    • M1 β†’ optional precision entry

    Indicators

    • EMA 50 (trend)
    • EMA 21 and EMA 9 (momentum)
    • RSI (confirmation)
    • ATR (stop-loss calculation)
    Phase 1 – Strategy Design: XAUUSD Multi-Timeframe Momentum Scalper                                                                                                                                  
                                                                                                                                                                                                          
      Strategy Overview               
                                                                                                                                                                                                          
      Name: Gold Momentum Scalper                                                                                                                                                                         
      Instrument: XAUUSD                                                                                                                                                                                  
      Style: Intraday scalping / short-term momentum                                                                                                                                                      
      Best market conditions: Trending and breakout (avoids choppy ranges)                                                                                                                                
                                                                                                                                                                                                          
      ---                                                                                                                                                                                                 
      1. Timeframes                                                                                                                                                                                       
                      
      β”Œβ”€β”€β”€β”€β”€β”€β”€β”€β”€β”€β”€β”¬β”€β”€β”€β”€β”€β”€β”€β”€β”€β”€β”€β”€β”€β”€β”€β”€β”€β”€β”€β”€β”€β”€β”€β”€β”€β”€β”€β”€β”€β”€β”€β”€β”€β”€β”€β”€β”€β”€β”€β”€β”€β”€β”€β”€β”€β”€β”€β”€β”€β”€β”€β”€β”€β”€β”€β”€β”€β”€β”€β”€β”€β”€β”€β”€β”€β”€β”€β”€β”€β”
      β”‚ Timeframe β”‚                               Purpose                               β”‚
      β”œβ”€β”€β”€β”€β”€β”€β”€β”€β”€β”€β”€β”Όβ”€β”€β”€β”€β”€β”€β”€β”€β”€β”€β”€β”€β”€β”€β”€β”€β”€β”€β”€β”€β”€β”€β”€β”€β”€β”€β”€β”€β”€β”€β”€β”€β”€β”€β”€β”€β”€β”€β”€β”€β”€β”€β”€β”€β”€β”€β”€β”€β”€β”€β”€β”€β”€β”€β”€β”€β”€β”€β”€β”€β”€β”€β”€β”€β”€β”€β”€β”€β”€β”€
      β”‚ M15       β”‚ Higher timeframe β€” determines trend direction (trend filter)        β”‚
      β”œβ”€β”€β”€β”€β”€β”€β”€β”€β”€β”€β”€β”Όβ”€β”€β”€β”€β”€β”€β”€β”€β”€β”€β”€β”€β”€β”€β”€β”€β”€β”€β”€β”€β”€β”€β”€β”€β”€β”€β”€β”€β”€β”€β”€β”€β”€β”€β”€β”€β”€β”€β”€β”€β”€β”€β”€β”€β”€β”€β”€β”€β”€β”€β”€β”€β”€β”€β”€β”€β”€β”€β”€β”€β”€β”€β”€β”€β”€β”€β”€β”€β”€β”€
      β”‚ M5        β”‚ Execution timeframe β€” entry/exit signals                            β”‚                                                                                                                 
      β”œβ”€β”€β”€β”€β”€β”€β”€β”€β”€β”€β”€β”Όβ”€β”€β”€β”€β”€β”€β”€β”€β”€β”€β”€β”€β”€β”€β”€β”€β”€β”€β”€β”€β”€β”€β”€β”€β”€β”€β”€β”€β”€β”€β”€β”€β”€β”€β”€β”€β”€β”€β”€β”€β”€β”€β”€β”€β”€β”€β”€β”€β”€β”€β”€β”€β”€β”€β”€β”€β”€β”€β”€β”€β”€β”€β”€β”€β”€β”€β”€β”€β”€β”€
      β”‚ M1        β”‚ Precision timing β€” optional for tighter entries during live trading β”‚                                                                                                                 
      β””β”€β”€β”€β”€β”€β”€β”€β”€β”€β”€β”€β”΄β”€β”€β”€β”€β”€β”€β”€β”€β”€β”€β”€β”€β”€β”€β”€β”€β”€β”€β”€β”€β”€β”€β”€β”€β”€β”€β”€β”€β”€β”€β”€β”€β”€β”€β”€β”€β”€β”€β”€β”€β”€β”€β”€β”€β”€β”€β”€β”€β”€β”€β”€β”€β”€β”€β”€β”€β”€β”€β”€β”€β”€β”€β”€β”€β”€β”€β”€β”€β”€β”˜                                                                                                                 
       
      The M15 acts as a "big picture" filter. We only take trades in the direction of the M15 trend. The M5 provides the actual entry signals.                                                            
                      
      ---                                                                                                                                                                                                 
      2. Indicators Used
                        
      All standard, well-defined, and fully programmable:
                                                                                                                                                                                                          
      β”Œβ”€β”€β”€β”€β”€β”€β”€β”€β”€β”€β”€β”€β”€β”€β”¬β”€β”€β”€β”€β”€β”€β”€β”€β”€β”€β”€β”¬β”€β”€β”€β”€β”€β”€β”€β”€β”€β”€β”€β”€β”€β”€β”€β”€β”€β”€β”€β”€β”€β”€β”€β”€β”€β”€β”€β”€β”€β”€β”€β”€β”€β”€β”€β”€β”€β”€β”€β”€β”€β”€β”€β”€β”€β”€β”€β”€β”€β”€β”€β”€β”
      β”‚  Indicator   β”‚ Settings  β”‚                      Purpose                       β”‚                                                                                                                   
      β”œβ”€β”€β”€β”€β”€β”€β”€β”€β”€β”€β”€β”€β”€β”€β”Όβ”€β”€β”€β”€β”€β”€β”€β”€β”€β”€β”€β”Όβ”€β”€β”€β”€β”€β”€β”€β”€β”€β”€β”€β”€β”€β”€β”€β”€β”€β”€β”€β”€β”€β”€β”€β”€β”€β”€β”€β”€β”€β”€β”€β”€β”€β”€β”€β”€β”€β”€β”€β”€β”€β”€β”€β”€β”€β”€β”€β”€β”€β”€β”€β”€β”€
      β”‚ EMA 50 (M15) β”‚ period=50 β”‚ Trend direction filter                             β”‚
      β”œβ”€β”€β”€β”€β”€β”€β”€β”€β”€β”€β”€β”€β”€β”€β”Όβ”€β”€β”€β”€β”€β”€β”€β”€β”€β”€β”€β”Όβ”€β”€β”€β”€β”€β”€β”€β”€β”€β”€β”€β”€β”€β”€β”€β”€β”€β”€β”€β”€β”€β”€β”€β”€β”€β”€β”€β”€β”€β”€β”€β”€β”€β”€β”€β”€β”€β”€β”€β”€β”€β”€β”€β”€β”€β”€β”€β”€β”€β”€β”€β”€β”€
      β”‚ EMA 21 (M5)  β”‚ period=21 β”‚ Short-term trend on execution TF                   β”‚                                                                                                                   
      β”œβ”€β”€β”€β”€β”€β”€β”€β”€β”€β”€β”€β”€β”€β”€β”Όβ”€β”€β”€β”€β”€β”€β”€β”€β”€β”€β”€β”Όβ”€β”€β”€β”€β”€β”€β”€β”€β”€β”€β”€β”€β”€β”€β”€β”€β”€β”€β”€β”€β”€β”€β”€β”€β”€β”€β”€β”€β”€β”€β”€β”€β”€β”€β”€β”€β”€β”€β”€β”€β”€β”€β”€β”€β”€β”€β”€β”€β”€β”€β”€β”€β”€                                                                                                                   
      β”‚ EMA 9 (M5)   β”‚ period=9  β”‚ Fast momentum line                                 β”‚                                                                                                                   
      β”œβ”€β”€β”€β”€β”€β”€β”€β”€β”€β”€β”€β”€β”€β”€β”Όβ”€β”€β”€β”€β”€β”€β”€β”€β”€β”€β”€β”Όβ”€β”€β”€β”€β”€β”€β”€β”€β”€β”€β”€β”€β”€β”€β”€β”€β”€β”€β”€β”€β”€β”€β”€β”€β”€β”€β”€β”€β”€β”€β”€β”€β”€β”€β”€β”€β”€β”€β”€β”€β”€β”€β”€β”€β”€β”€β”€β”€β”€β”€β”€β”€β”€                                                                                                                   
      β”‚ RSI (M5)     β”‚ period=14 β”‚ Momentum confirmation + overbought/oversold filter β”‚
      β”œβ”€β”€β”€β”€β”€β”€β”€β”€β”€β”€β”€β”€β”€β”€β”Όβ”€β”€β”€β”€β”€β”€β”€β”€β”€β”€β”€β”Όβ”€β”€β”€β”€β”€β”€β”€β”€β”€β”€β”€β”€β”€β”€β”€β”€β”€β”€β”€β”€β”€β”€β”€β”€β”€β”€β”€β”€β”€β”€β”€β”€β”€β”€β”€β”€β”€β”€β”€β”€β”€β”€β”€β”€β”€β”€β”€β”€β”€β”€β”€β”€β”€                                                                                                                   
      β”‚ ATR (M5)     β”‚ period=14 β”‚ Dynamic stop loss sizing                           β”‚
      β””β”€β”€β”€β”€β”€β”€β”€β”€β”€β”€β”€β”€β”€β”€β”΄β”€β”€β”€β”€β”€β”€β”€β”€β”€β”€β”€β”΄β”€β”€β”€β”€β”€β”€β”€β”€β”€β”€β”€β”€β”€β”€β”€β”€β”€β”€β”€β”€β”€β”€β”€β”€β”€β”€β”€β”€β”€β”€β”€β”€β”€β”€β”€β”€β”€β”€β”€β”€β”€β”€β”€β”€β”€β”€β”€β”€β”€β”€β”€β”€β”˜                                                                                                                   
                      
      ---                                                                                                                                                                                                 
      3. Entry Rules  
    
      LONG Entry (all must be true):
    
      1. M15 Trend Filter: Price is above EMA 50 on M15                                                                                                                                                   
      2. M5 EMA Crossover: EMA 9 crosses above EMA 21 on M5
      3. RSI Confirmation: RSI(14) on M5 is between 40 and 70 (not overbought, has room to run)                                                                                                           
      4. Price above EMA 21 on M5 at the time of signal                                                                                                                                                   
      5. Spread filter: Current spread ≀ 30 points (avoids entries during illiquid periods)                                                                                                               
                                                                                                                                                                                                          
      SHORT Entry (all must be true):                                                                                                                                                                     
                                                                                                                                                                                                          
      1. M15 Trend Filter: Price is below EMA 50 on M15                                                                                                                                                   
      2. M5 EMA Crossover: EMA 9 crosses below EMA 21 on M5
      3. RSI Confirmation: RSI(14) on M5 is between 30 and 60 (not oversold, has room to fall)                                                                                                            
      4. Price below EMA 21 on M5 at the time of signal                                                                                                                                                   
      5. Spread filter: Current spread ≀ 30 points
                                                                                                                                                                                                          
      ---                                                                                                                                                                                                 
      4. Stop Loss Logic
                                                                                                                                                                                                          
      Dynamic SL based on ATR:
    
      Stop Loss Distance = ATR(14) on M5 Γ— 1.5
                                                                                                                                                                                                          
      - LONG: SL = Entry Price βˆ’ (ATR Γ— 1.5)                                                                                                                                                              
      - SHORT: SL = Entry Price + (ATR Γ— 1.5)                                                                                                                                                             
                                                                                                                                                                                                          
      Why ATR Γ— 1.5? Gold is volatile. A 1Γ— ATR stop gets hit by noise too often. 1.5Γ— gives room to breathe while staying tight enough for scalping.                                                     
       
      Minimum SL: 200 points (2.00 USD) β€” prevents absurdly tight stops in low-vol periods.                                                                                                               
      Maximum SL: 800 points (8.00 USD) β€” prevents outsized risk in extreme volatility.
                                                                                                                                                                                                          
      ---             
      5. Take Profit Logic (Tiered)                                                                                                                                                                       
                                   
      Based on your risk management rules:
                                                                                                                                                                                                          
      SL_distance = ATR(14) Γ— 1.5
                                                                                                                                                                                                          
      TP1 = Entry Β± (SL_distance Γ— 1.0)    β†’ 1:1 RR                                                                                                                                                       
      TP2 = Entry Β± (SL_distance Γ— 2.0)    β†’ 1:2 RR
      TP3 = Entry Β± (SL_distance Γ— 3.0)    β†’ 1:3 RR                                                                                                                                                       
                                                                                                                                                                                                          
      Position management at each level:
                                                                                                                                                                                                          
      β”Œβ”€β”€β”€β”€β”€β”€β”€β”€β”€β”€β”€β”€β”¬β”€β”€β”€β”€β”€β”€β”€β”€β”€β”€β”€β”€β”€β”€β”€β”€β”€β”€β”€β”€β”€β”€β”€β”€β”€β”€β”€β”€β”€β”€β”€β”€β”€β”€β”€β”€β”€β”€β”€β”€β”€β”€β”€β”€β”€β”€β”                                                                                                                                       
      β”‚   Event    β”‚                    Action                    β”‚
      β”œβ”€β”€β”€β”€β”€β”€β”€β”€β”€β”€β”€β”€β”Όβ”€β”€β”€β”€β”€β”€β”€β”€β”€β”€β”€β”€β”€β”€β”€β”€β”€β”€β”€β”€β”€β”€β”€β”€β”€β”€β”€β”€β”€β”€β”€β”€β”€β”€β”€β”€β”€β”€β”€β”€β”€β”€β”€β”€β”€β”€β”€                                                                                                                                       
      β”‚ TP1 hit    β”‚ Close 50% of position, move SL to Break Even β”‚
      β”œβ”€β”€β”€β”€β”€β”€β”€β”€β”€β”€β”€β”€β”Όβ”€β”€β”€β”€β”€β”€β”€β”€β”€β”€β”€β”€β”€β”€β”€β”€β”€β”€β”€β”€β”€β”€β”€β”€β”€β”€β”€β”€β”€β”€β”€β”€β”€β”€β”€β”€β”€β”€β”€β”€β”€β”€β”€β”€β”€β”€β”€
      β”‚ TP2 hit    β”‚ Move SL to TP1 level                         β”‚
      β”œβ”€β”€β”€β”€β”€β”€β”€β”€β”€β”€β”€β”€β”Όβ”€β”€β”€β”€β”€β”€β”€β”€β”€β”€β”€β”€β”€β”€β”€β”€β”€β”€β”€β”€β”€β”€β”€β”€β”€β”€β”€β”€β”€β”€β”€β”€β”€β”€β”€β”€β”€β”€β”€β”€β”€β”€β”€β”€β”€β”€β”€
      β”‚ TP3 hit    β”‚ Move SL to TP2 level                         β”‚
      β”œβ”€β”€β”€β”€β”€β”€β”€β”€β”€β”€β”€β”€β”Όβ”€β”€β”€β”€β”€β”€β”€β”€β”€β”€β”€β”€β”€β”€β”€β”€β”€β”€β”€β”€β”€β”€β”€β”€β”€β”€β”€β”€β”€β”€β”€β”€β”€β”€β”€β”€β”€β”€β”€β”€β”€β”€β”€β”€β”€β”€β”€                                                                                                                                       
      β”‚ Beyond TP3 β”‚ Trail SL by 1Γ— ATR behind price              β”‚
      β””β”€β”€β”€β”€β”€β”€β”€β”€β”€β”€β”€β”€β”΄β”€β”€β”€β”€β”€β”€β”€β”€β”€β”€β”€β”€β”€β”€β”€β”€β”€β”€β”€β”€β”€β”€β”€β”€β”€β”€β”€β”€β”€β”€β”€β”€β”€β”€β”€β”€β”€β”€β”€β”€β”€β”€β”€β”€β”€β”€β”˜                                                                                                                                       
                      
      ---                                                                                                                                                                                                 
      6. Exit Rules   
    
      A trade is closed when:
      1. Stop Loss is hit (at any stage)
      2. TP3 is hit and trailing stop triggers                                                                                                                                                            
      3. Trend reversal on M15: EMA 50 direction changes (price crosses to other side) β†’ close remaining position at market
      4. End-of-day cutoff: Close all positions 30 minutes before daily market close (to avoid overnight gaps on CFD accounts)                                                                            
      5. Max trade duration: 4 hours β€” if a trade hasn't hit TP1 after 4 hours, close it (the momentum thesis has failed)                                                                                 
                                                                                                                                                                                                          
      ---                                                                                                                                                                                                 
      7. Risk Management Rules                                                                                                                                                                            
                                                                                                                                                                                                          
      - Risk per trade: 1% of account balance
      - Max concurrent trades: 1 (one trade at a time β€” gold moves enough)
      - Max daily loss: 3% of account balance β†’ stop trading for the day                                                                                                                                  
      - Max daily trades: 5 (prevents overtrading on choppy days)                                                                                                                                         
      - No trading during major news: Skip entries within Β±15 minutes of high-impact USD/gold news events (we'll integrate an economic calendar)                                                          
                                                                                                                                                                                                          
      ---                                                                                                                                                                                                 
      8. Position Sizing                                                                                                                                                                                  
                      
      Position Size (lots) = (Account Balance Γ— 0.01) / (SL_distance_in_points Γ— point_value)
                                                                                                                                                                                                          
      For XAUUSD on most brokers:                                                                                                                                                                         
      - 1 standard lot = 100 oz                                                                                                                                                                           
      - 1 point (0.01) value per lot β‰ˆ $1.00 (varies by broker)                                                                                                                                           
                                                               
      Example: $10,000 account, ATR-based SL = 500 points (5.00 USD move)                                                                                                                                 
      Risk amount = $10,000 Γ— 0.01 = $100                                                                                                                                                                 
      Lot size = $100 / (500 Γ— $0.10) = 2.0 lots  [point value on mini lot]                                                                                                                               
                                                                                                                                                                                                          
      We'll calculate this dynamically using the broker's actual contract spec.                                                                                                                           
                                                                                                                                                                                                          
      ---                                                                                                                                                                                                 
      9. Session Filter                                                                                                                                                                                   
                       
      Gold has distinct trading sessions with different behavior:
                                                                                                                                                                                                          
      β”Œβ”€β”€β”€β”€β”€β”€β”€β”€β”€β”€β”€β”€β”€β”€β”€β”€β”€β”€β”¬β”€β”€β”€β”€β”€β”€β”€β”€β”€β”€β”€β”€β”€β”¬β”€β”€β”€β”€β”€β”€β”€β”€β”€β”€β”€β”€β”€β”€β”€β”€β”€β”€β”€β”€β”€β”€β”€β”€β”€β”                                                                                                                                        
      β”‚     Session      β”‚ Hours (UTC) β”‚         Trade?          β”‚                                                                                                                                        
      β”œβ”€β”€β”€β”€β”€β”€β”€β”€β”€β”€β”€β”€β”€β”€β”€β”€β”€β”€β”Όβ”€β”€β”€β”€β”€β”€β”€β”€β”€β”€β”€β”€β”€β”Όβ”€β”€β”€β”€β”€β”€β”€β”€β”€β”€β”€β”€β”€β”€β”€β”€β”€β”€β”€β”€β”€β”€β”€β”€β”€β”€                                                                                                                                        
      β”‚ Asian            β”‚ 00:00–06:00 β”‚ No β€” low volume, choppy β”‚
      β”œβ”€β”€β”€β”€β”€β”€β”€β”€β”€β”€β”€β”€β”€β”€β”€β”€β”€β”€β”Όβ”€β”€β”€β”€β”€β”€β”€β”€β”€β”€β”€β”€β”€β”Όβ”€β”€β”€β”€β”€β”€β”€β”€β”€β”€β”€β”€β”€β”€β”€β”€β”€β”€β”€β”€β”€β”€β”€β”€β”€β”€
      β”‚ London           β”‚ 07:00–15:00 β”‚ Yes β€” best trends       β”‚                                                                                                                                        
      β”œβ”€β”€β”€β”€β”€β”€β”€β”€β”€β”€β”€β”€β”€β”€β”€β”€β”€β”€β”Όβ”€β”€β”€β”€β”€β”€β”€β”€β”€β”€β”€β”€β”€β”Όβ”€β”€β”€β”€β”€β”€β”€β”€β”€β”€β”€β”€β”€β”€β”€β”€β”€β”€β”€β”€β”€β”€β”€β”€β”€β”€                                                                                                                                        
      β”‚ New York         β”‚ 13:00–20:00 β”‚ Yes β€” high volatility   β”‚                                                                                                                                        
      β”œβ”€β”€β”€β”€β”€β”€β”€β”€β”€β”€β”€β”€β”€β”€β”€β”€β”€β”€β”Όβ”€β”€β”€β”€β”€β”€β”€β”€β”€β”€β”€β”€β”€β”Όβ”€β”€β”€β”€β”€β”€β”€β”€β”€β”€β”€β”€β”€β”€β”€β”€β”€β”€β”€β”€β”€β”€β”€β”€β”€β”€                                                                                                                                        
      β”‚ Overlap (Lon+NY) β”‚ 13:00–15:00 β”‚ Yes β€” peak liquidity    β”‚
      β””β”€β”€β”€β”€β”€β”€β”€β”€β”€β”€β”€β”€β”€β”€β”€β”€β”€β”€β”΄β”€β”€β”€β”€β”€β”€β”€β”€β”€β”€β”€β”€β”€β”΄β”€β”€β”€β”€β”€β”€β”€β”€β”€β”€β”€β”€β”€β”€β”€β”€β”€β”€β”€β”€β”€β”€β”€β”€β”€β”˜                                                                                                                                        
       
      Active trading window: 07:00 – 20:00 UTC                                                                                                                                                            
                      
      ---                                                                                                                                                                                                 
      Summary of Strategy Rules
                                                                                                                                                                                                          
      TREND FILTER:    M15 EMA(50) direction
      SIGNAL:          M5 EMA(9)/EMA(21) crossover                                                                                                                                                        
      CONFIRMATION:    RSI(14) in valid zone + price above/below EMA(21)                                                                                                                                  
      STOP LOSS:       ATR(14) Γ— 1.5 (clamped 200–800 points)                                                                                                                                             
      TAKE PROFIT:     Tiered: TP1=1R, TP2=2R, TP3=3R + trail                                                                                                                                             
      RISK:            1% per trade, max 3% daily loss                                                                                                                                                    
      POSITION SIZE:   Calculated from risk % and SL distance                                                                                                                                             
      SESSIONS:        London + New York only (07:00–20:00 UTC)                                                                                                                                           
      MAX TRADES/DAY:  5                                                                                                                                                                                  
      MAX DURATION:    4 hours per trade                                                                                                                                                                  
                      
      ---                                                                                                                                                                                                 
      What's Next     
                 
      Before we move to Phase 2 (detailed risk management implementation) and Phase 3 (architecture), I want to make sure you're aligned on this strategy.
                                                                                                                                                                                                          
      Questions for you:
                                                                                                                                                                                                          
      1. Are you comfortable with these indicator choices (EMAs + RSI + ATR), or do you want to explore alternatives (e.g., Bollinger Bands, VWAP, MACD)?                                                 
      2. Is the 1-trade-at-a-time rule okay, or do you want to allow 2-3 concurrent positions?
      3. The session filter excludes Asian session β€” agree?                                                                                                                                               
      4. Any changes to the TP levels or SL multiplier?                                                                                                                                                   
                                                                                                                                                                                                          
      Let me know if you want to adjust anything, or if we should proceed to Phase 2.  

    This is one of the biggest advantages of using Claude for development:
    It doesn’t jump directly to code β€” it first builds a logical system.


    Step 5 – Entry Rules That Can Be Automated

    Claude then created fully programmable entry rules.

    For example, a long trade only happens when:

    • Price is above EMA 50 on M15
    • EMA 9 crosses above EMA 21 on M5
    • RSI is inside a valid range
    • Price is above EMA 21
    • Spread is acceptable

    This is extremely important because most trading strategies online are vague.

    This one is completely rule-based, meaning it can actually be automated.


    Step 6 – Risk Management (The Most Important Part)

    Instead of focusing only on entries, Claude focused heavily on risk management.

    The system uses:

    • 1% risk per trade
    • ATR-based stop loss
    • Multiple take-profit levels
    • Partial closing
    • Break-even logic
    • Daily risk limits

    This is where the project starts to look like a real trading system instead of a simple bot.


    Step 7 – The Real Development Phase Begins

    After defining the strategy, Claude moved to the next step:

    How to actually build the system.

    That includes:

    • project structure
    • database structure
    • backtesting engine
    • data downloader
    • live trading logic
    • and a dashboard

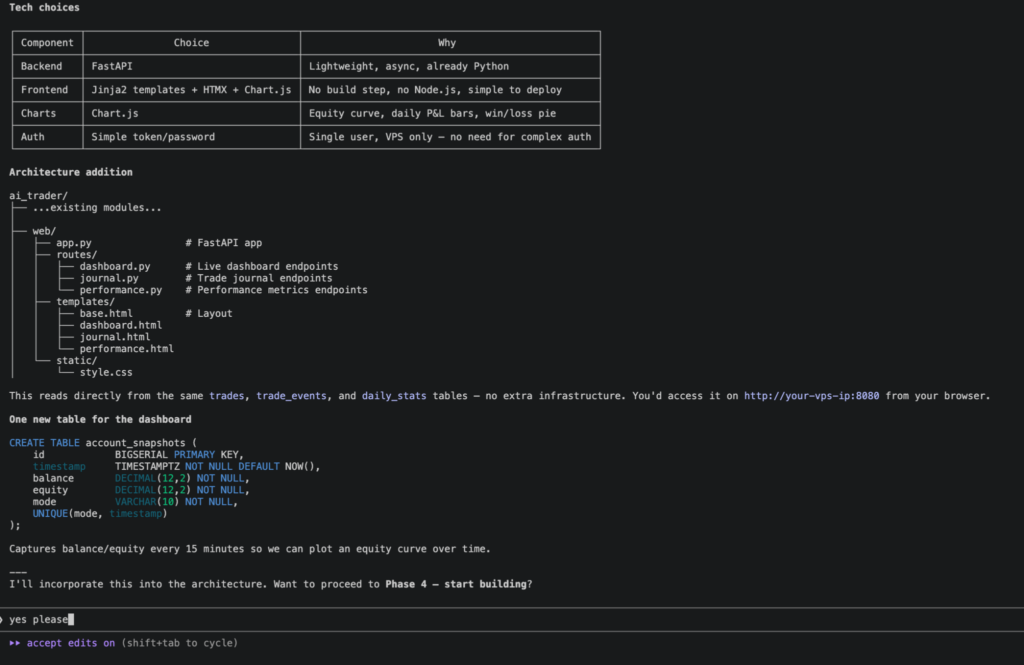
    This is the moment where Claude stops being a β€œcoding assistant” and becomes a real software architect.


    Step 8 – Running the Project on a Windows VPS

    The next show the actual commands needed to run the project:

    cp .env.example .env
    pip install -r requirements.txt
    createdb ai_trader
    python main.py migrate
    python main.py download --start 2024-01-01
    python main.py backtest --start 2024-01-01 --end 2025-12-31 --balance 10000
    python main.py dashboard
    python main.py live
    

    This proves the project is not theoretical β€” it actually runs.


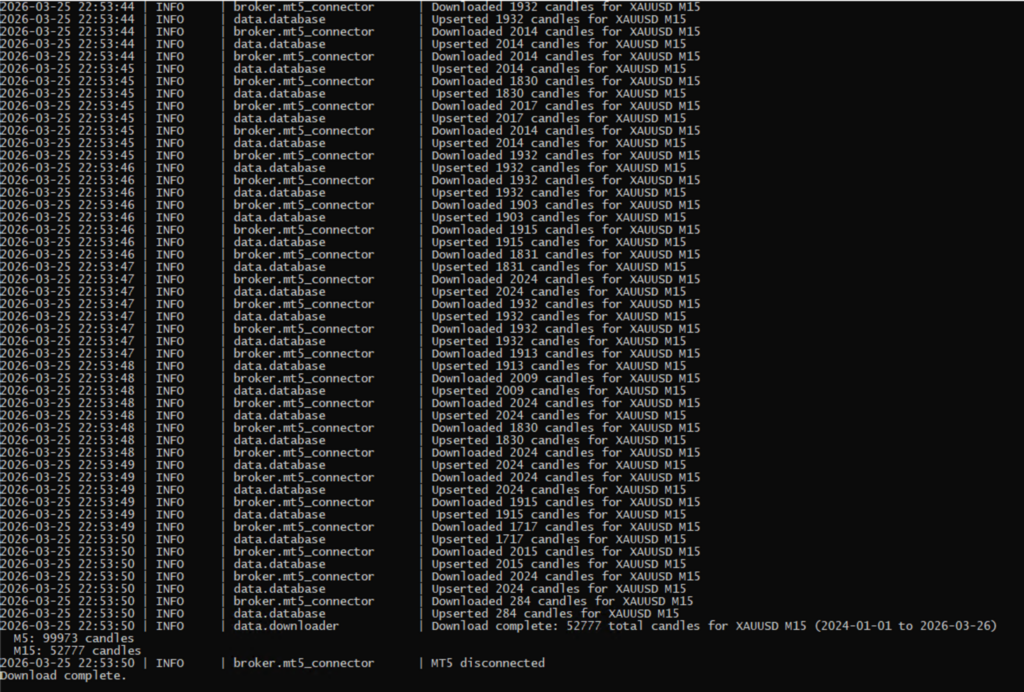
    Step 9 – Downloading Historical Data

    This part is essential because without historical data:

    • you cannot test a strategy
    • you cannot optimize it
    • and you cannot validate risk

    Claude generated the command and the logic to connect the trading platform and retrieve data automatically.


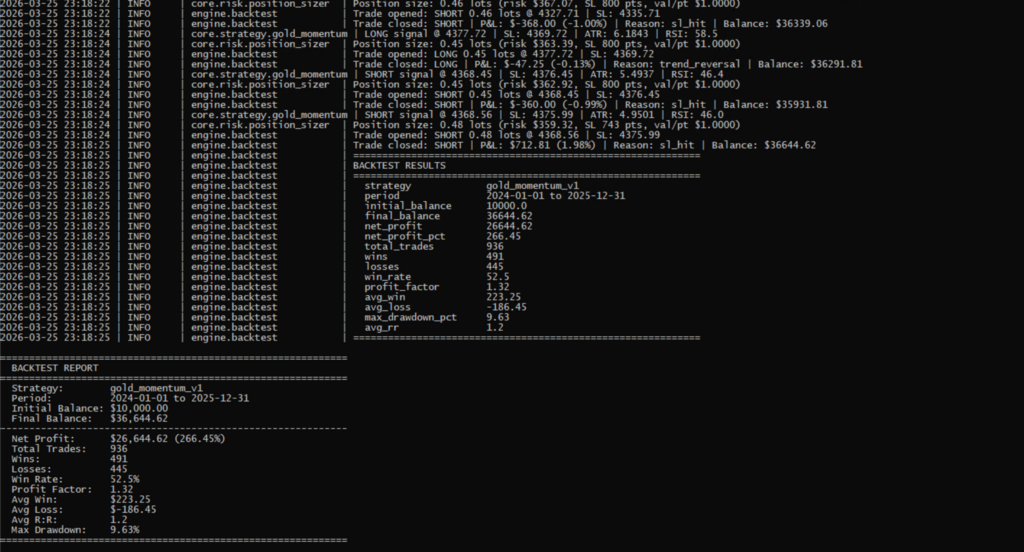
    Step 10 – Running the First Backtest

    After the data was downloaded, the next step was:

    python main.py backtest --start 2024-01-01 --end 2025-12-31 --balance 10000
    

    The screenshots show:

    • the execution of the backtest
    • the output
    • and the first results

    This is the point where the project becomes real, because the strategy is no longer theoretical β€” it’s being tested using real historical data.


    Step 11 – Adjustments and Improvements

    After running the first tests, I asked Claude to improve the strategy based on the results.

    This part is one of the most powerful uses of AI in development:

    Instead of rewriting everything manually, you can iterate faster.


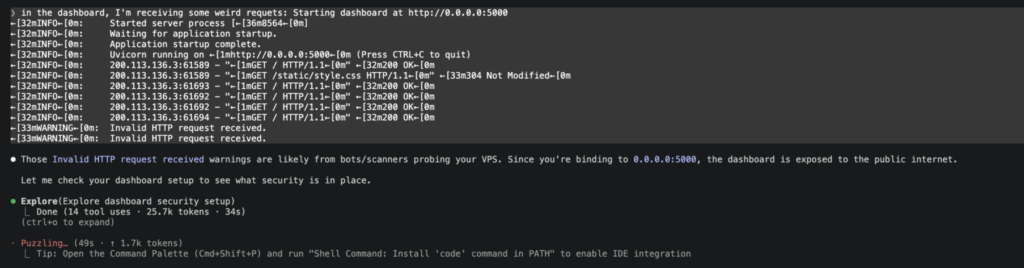
    Step 12 – The Dashboard

    The next screenshot shows the web dashboard generated for the project.

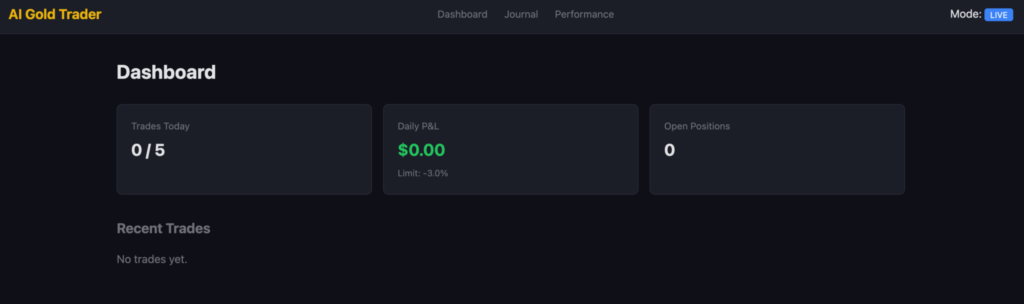
    This dashboard allows you to:

    • see trades
    • analyze performance
    • visualize results
    • monitor the strategy

    This is something that would normally take days to build manually.


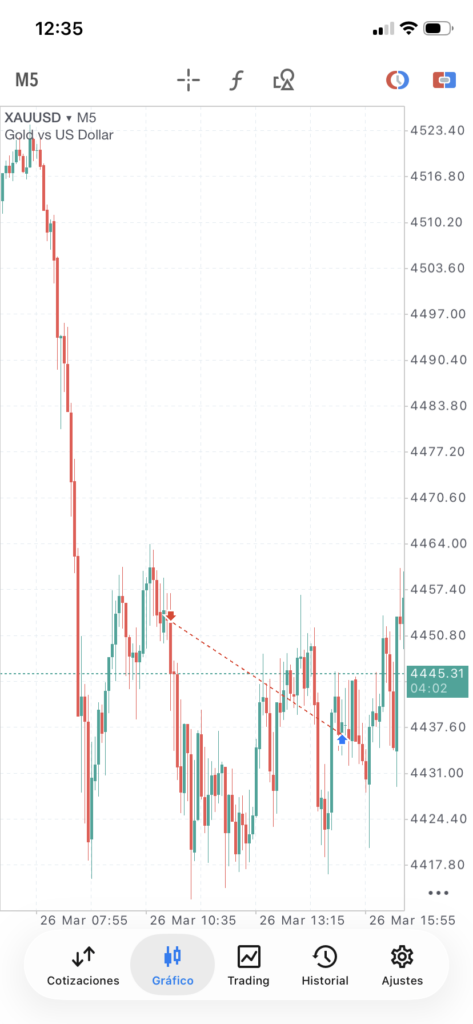
    Step 13 – A Real Operation in the Market

    One of the final screenshots shows an actual trade executed in the real market (demo account).

    This means:

    • strategy β†’ defined
    • code β†’ implemented
    • backtest β†’ completed
    • live execution β†’ working

    That’s not a tutorial example. That’s a real trading system running.


    Step 14 – Final Thoughts

    This project proved something very interesting:

    Claude is not just useful for writing functions.

    It can help you:

    • design a system
    • define a strategy
    • write production-ready code
    • create a full architecture
    • test it
    • and deploy it

    In other words, it can act like a technical partner, not just a coding tool.

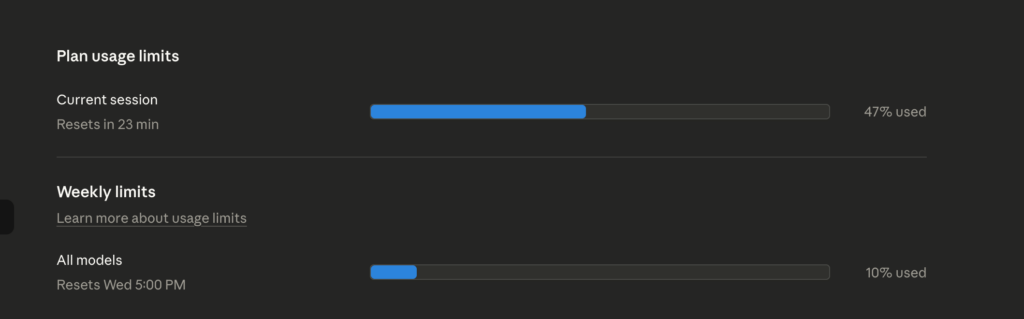
    After all changes here the claude usage:


    If You’re a Developer Interested in AI

    This is probably the most important takeaway:

    AI is not replacing developers.
    It’s amplifying developers who know how to structure problems correctly

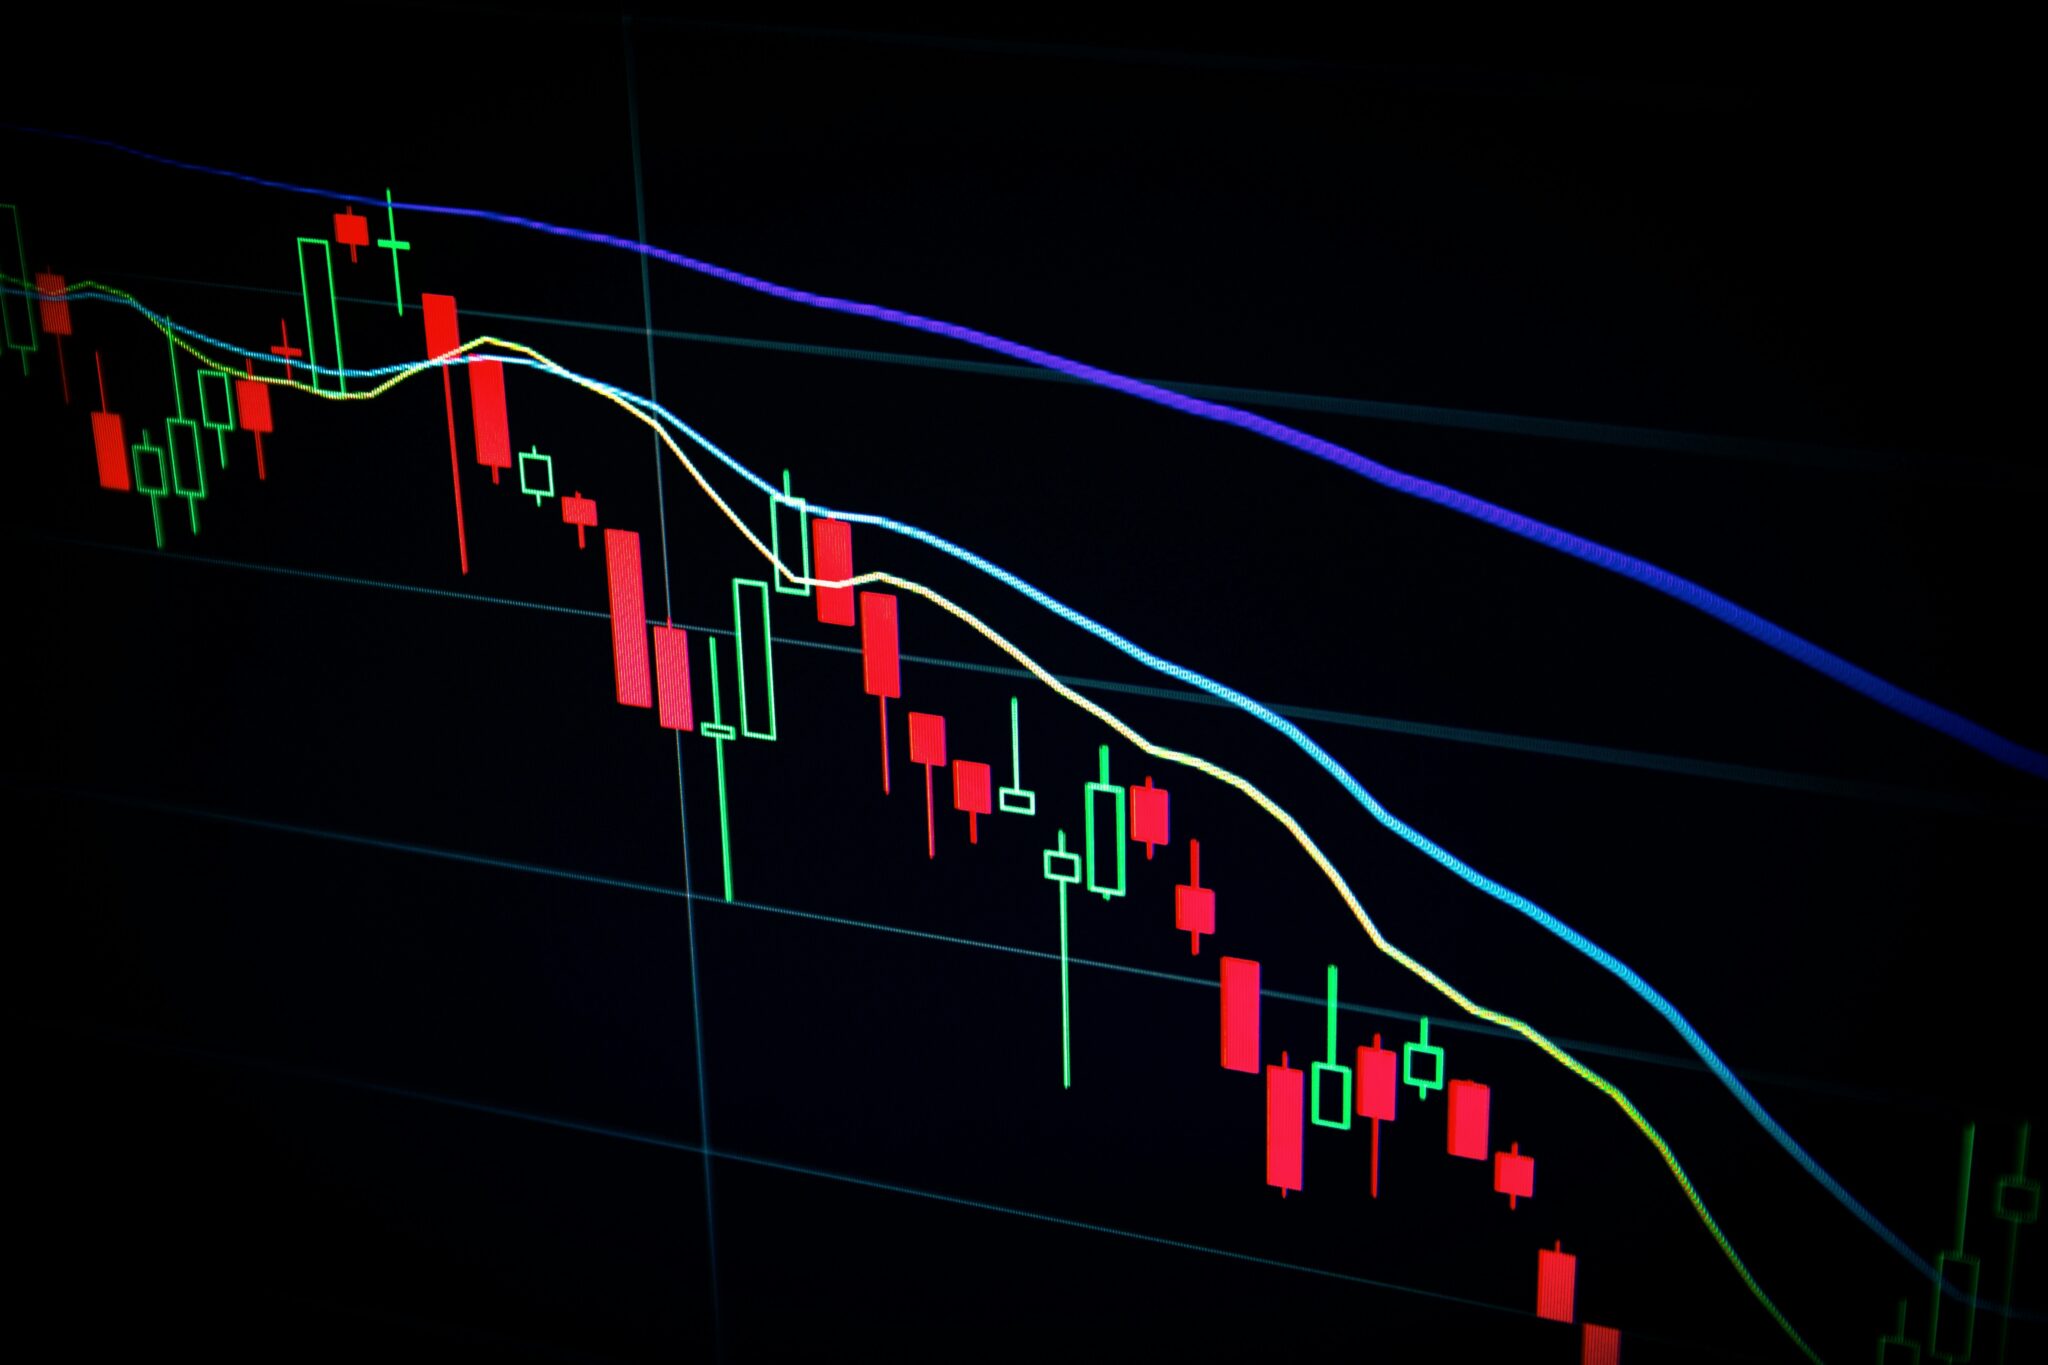
    An operation in real market

    9 mins